Render to texture (RTT) is essential for many rendering effects. A common way to do this with OpenSceneGraph is to use nested cameras in the scene graph, i.e. the camera is attached as a child node in the scene graph. However, this approach has some limitations:
- The scene graph must be adapted, which leads to confusing layouts.
- The resources in the scene graph are usually allocated per view. However, nested cameras share the same view as the main camera. Therefore, some effects, such as view dependent shadow maps, are incompatible with nested RTT cameras [1].
These limitations can be solved by using slave RTT cameras. In the following, I'll show you how to do this in a simple example.
Creating a Slave Camera
The implementation of a slave RTT camera is the same as for a nested camera. The osg::Camera is subclassed and the camera configured. A texture is created and assigned as a color buffer to the camera.
class RenderColorToTexture : public osg::Camera
{
public:
    RenderColorToTexture()
    {
        setClearMask(GL_COLOR_BUFFER_BIT | GL_DEPTH_BUFFER_BIT);
        setRenderTargetImplementation(osg::Camera::FRAME_BUFFER_OBJECT);
        setRenderOrder(osg::Camera::PRE_RENDER);
        setName("RenderColor");
        _texture = new osg::Texture2D();
        _texture->setSourceFormat(GL_RGBA);
        _texture->setInternalFormat(GL_RGBA32F_ARB);
        _texture->setSourceType(GL_FLOAT);
        attach(osg::Camera::COLOR_BUFFER0, _texture);
    }
    virtual ~RenderColorToTexture(){}
    osg::Texture2D * getTexture() const
    {
        return _texture.get();
    }
private:
    osg::ref_ptr<osg::Texture2D> _texture;
};
Creating a Graphics Context
In contrast to nested cameras, we need to set the graphics context as well as the viewport for each slave camera. The graphics context can be either queried from the viewer or manually created. A manual graphics context should be used when the default camera from the viewer is not required. For example, this is useful for the G-Buffer render pass of a deferred renderer. In this example, the graphics context will be manually created.
The creation of the graphics context is straightforward. The osg::GraphicsContext::Traits define the properties of the context and is required to construct a osg::GraphicsContext instance.
osg::ref_ptr<osg::GraphicsContext::Traits> traits = new osg::GraphicsContext::Traits;
traits->x = 0;
traits->y = 0;
traits->width = width;
traits->height = height;
traits->windowDecoration = true; // window border etc.
traits->doubleBuffer = true;
traits->sharedContext = 0;
traits->vsync = false;
osg::ref_ptr<osg::GraphicsContext>  graphicsContext =
                     osg::GraphicsContext::createGraphicsContext(traits.get());
Setting up the Cameras
Finally, we can set up the cameras, assign the graphics context as well as the viewport and add it to the viewer as a slave camera.
RenderColorToTexture *rtt = new RenderColorToTexture();
rtt->setViewport(0,0,width,height);
rtt->setGraphicsContext(graphicsContext);
//add it as a slave to the viewer
viewer.addSlave(rtt);
In order to display the rendered texture, a second slave camera is used. This camera only renders a fullscreen quad and therefore, provides a custom scene graph. The custom scene graph can be enabled by setting the parameter useMastersSceneData of setSlave to false.
//set up the display camera.
DisplayTexture display = new DisplayTexture;
display->addChild(createFullscreenQuad());
display->setGraphicsContext(graphicsContext);
display->setViewport(0,0,width,height);
display->setTexture(rtt->getTexture());
//The display camera provides it's own scene graph
viewer.addSlave(display, osg::Matrix(), osg::Matrix(), false);
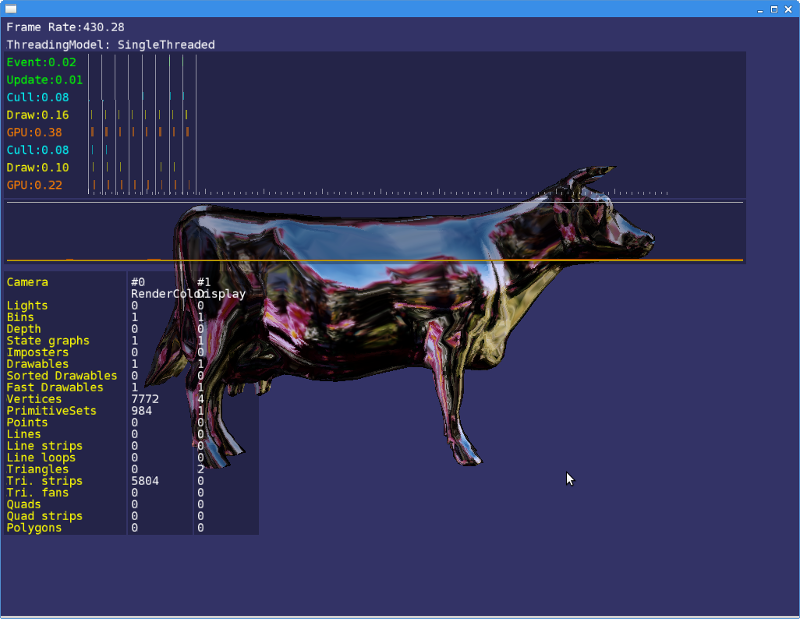
The resulting image:
Get the code here.
comments powered by Disqus